![[Return to Homepage]](/assets/imgs/RAMlogo.png)

In Fall 2013, Reynolds Charlotte customer Resident Dreamer Studios begun its trek to resurrect a legend.
From Resident Dreamer Studios: “The first step was to secure the licensing rights from the Dille Family Trust, owners of all things “Buck Rogers”… piece. o. cake.
Next we needed to find and gain access to one of the few remaining screen used costumes so we could document the measurements, cuz grainy YouTube videos weren’t gonna cut it.
Our research showed that there were probably less than five remaining costumes in existence, and most were in rather terrible shape, as even the most optimistic SciFi fan never expecting the TV series to run 35 years. The surviving relics were locked away in the vaults of billionaires and movie studios, filed somewhere between the Lost Ark and Jimmy Hoffa’s golf clubs. Eventually we managed to finagle an hour long visit with one of the pieces. Frantic pics were snapped and endless measurements chicken scratched, all the while trying not to drip sweat on the artifact as the clock ticked away.
With the specs in hand we turned over the reference materials to our 3d Modeler, Joe Amaro, who began working his digital magic. Meanwhile we started building the arms and legs the old fashion way.
Often times for a project of this size the medium of choice is, well, “whatever works”. In the end the initial pieces were made from foam, resin, hardwood, hardboard, clay, epoxy, bondo, ABS plastic, fiberglass, and yes, at one time we even consider using a part from the kitchen sink.
The main sections of the arm and leg called for perfectly tapered cylinders, so we turned those in the woodshop on a lathe. Several other parts were 3d modeled and then printed using a Makerbot. While this consumer grade technology is still far from perfect we found using the simple machine often gave us the perfect starting point. The foot for example had an insane amount of odd angles and planes which would have been a nightmare to sculpt in clay. But once it was 3d printed we could easily sand the piece and add filler where needed.
The hand was another part made easier with the Makerbot, getting the exact tolerances so the thumb could slide smoothly into place was a breeze with a little digital assistance.
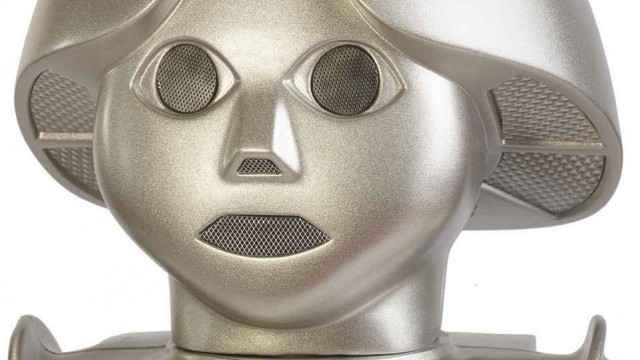
The shoulder had to be sculpted from scratch, it was a little troublesome finding solid references since the original costume shoulders were made from rubber, and have all pretty much deteriorated over time. Once roughed out in clay we molded and cast it so we had a solid resin piece that was easier to tool.
Once the 3d Models of the head and torso were done we opted to outsource their prototyping. The head was 3d printed on a “six figure machine”. When you get into high end 3d printing that’s actually a cheap machine with a slightly lower resolution, which means the surface of the resulting parts are a little rough. So after the printing they expose the parts to a “vapor bath”, where fumes from burning acetone wash over the parts and melt them ever so slightly to a mirror like finish, pretty awesome trick.
Due to the size of the torso we decided to use the 3d model to have it CNC milled from urethane foam. Unfortunately after we hard coated the foam we lost many of the fine details such as the grooved belt buckle and chest plate. Live and learn. So we went back to the Makerbot and printed out those detailed areas, molded and cast them and then attached them to the hard coated torso.
All of the insets on the skirt were done the same way, to keep them identical we 3d printed one, then molded it and hand cast several copies.
After all of the pieces were assembled we sprayed the parts with high build primer, sanded them down and sprayed and sanded again, for several weeks, until all the tool marks were gone and everything took on the smooth edged appearance of the original molded costume.
Once the pieces were perfect we molded them in silicone rubber, and cast them in urethane plastic. Some were poured nearly solid by hand, others were rotocast hollow to keep the weight down.
The newly cast pieces were then again primered and sprayed with a high end metallic paint, some of the details still had to be hand painted.
The last step, and proverbial frosting on our little chromed cupcake was inserting and epoxying the laser cut mesh screens and perforated steel pieces that allowed the actor to see and breathe.
And that’s how you make a Twiki…”


